 When it comes to Network Security, my philosophy is – “You can’t afford to know less than the Hacker.” This means that in order to protect ourselves effectively, we need to understand and experience the same tools and techniques that are used against us.
 The following article is a short introduction to EtterCap 0.6a, described by its authors simply as “a multipurpose sniffer / interceptor / logger for switched LANs”.
Ettercap heaviliy relies on ARP spoofing, and if this concept is new to you, you might want to read more about it (at www.mutsonline.com for example) before attempting this tutorial.
NOTE: ARP spoofing could cause damage to your network!
Be sure to try this in a separate lab environment! Ettercap can be found at http://ettercap.sourceforge.net.
(from the README file):
EtterCap is a multipurpose sniffer / interceptor / logger for a switched LAN. It supports active and passive dissection of many protocols (even ciphered ones) and includes many features for network and host analysis. These features include
- Characters injection in an established connection: You can inject character to server (emulating commands) or to client (emulating replies) maintaining the connection alive!
- SSH1 support: you can sniff User and Pass, and even the data of an SSH1 connection.
- HTTPS support: you can sniff http SSL secured data… and even if the connection is made through a PROXY
- Remote traffic through GRE tunnel: you can sniff remote traffic through a GRE tunnel from a remote Cisco router and make mitm attack on it
- PPTP broker: you can perform man in the middle attack against PPTP tunnels
- Password collector for: TELNET, FTP, POP, RLOGIN, SSH1, ICQ, SMB, MySQL, HTTP, NNTP, X11, NAPSTER, IRC, RIP, BGP, SOCKS 5, IMAP 4, VNC, LDAP, NFS, SNMP, HALF LIFE, QUAKE 3, MSN, YMSG.
- Packet filtering/dropping: You can set up a filter that search for a particular string (even hex) in the TCP or UDP payload and replace it with yours or drop the entire packet.
- OS fingerprint: you can fingerprint the OS of the victim host and even its network adapter
- Kill a connection: from the connections list you can kill all the connections you want
- Passive scanning of the LAN: you can retrieve info about: hosts in the LAN, open ports, services version, type of the host (gateway, router or simple host) and estimated distance in hop.
- Check for other poisoners: EtterCap has the ability to actively or passively find other poisoners on the LAN.
We will examine only a few of EtterCap’s features – the rest is up to you.
- The lab network consists of the following computers. 192.168.1.138 is the default Gateway. I’m using a Cisco Catalyst 2900XL Switch (switched environment).

- A quick IPConfig on the 192.168.1.1 machine (our victim) to show the IP and ARP cache. Notice the MAC addresses listed in the ARP Cache – this is the “Before” shot.

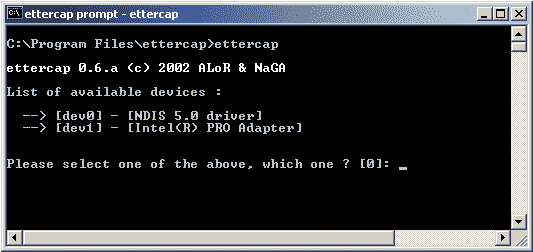
- I start EtterCap on my attacking machine (192.168.1.10) and choose my correct network adapter:

- Once this is done, a quick ARP scan is performed in order to map out the network, and then the following screen is shown:
- This is the main screen. From here you can perform most of EtterCap’s functions. You may press “H” on every screen to get a help menu, as shown in the next picture.

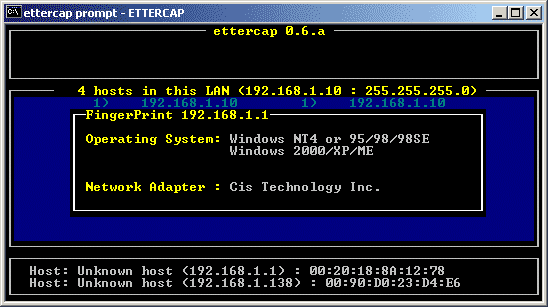
- EtterCap knows how to “FingerPrint” machines. This is done by selecting a machine in the main screen, and pressing the “F” button.

- Now for the hectic part… In order to start an ARP spoofing attack, we need to select a source and destination computer. I chose a client in my network (192.168.1.1) and my default gateway. This will effectively sniff all Internet traffic coming and going to 192.168.1.1. We now chose our source and destination as shown in the next picture, and press “A” in order to start the spoofing.

- Once “A” is pressed, the attacked machine gets ARP poisoned, as we can see from the following picture. Notice that the ARP addresses for 192.168.1.10 (attacking machine) and 192.168.1.138 (Default Gateway) are the same!


- We now will open an FTP session from the attacked computer (just as an example) and see what is logged.

- We can see that the FTP session was captured and logged, including the cleartext username and password.
- If we chose the specific session and enter it, we will see the actual data that passed on the network (see next picture).
- We have successfully managed to sniff a machine on a switched network. However, EtterCap can go beyond sniffing, and even intervene in existing sessions. It’s definitely one of those tools worth investigating.
- Don’t forget that by pressing “H” on each screen you’ll get a “Help” menu, to guide you as you go along.

- So we’ve ARP spoofed a few connections…weeeha. Where’s the “Beyond” you promised?
- Well, the beyond bit lies in the fact the EtterCap can intervene in the traffic stream, and modify strings at our will! The implications of this are endless, but I’ll give a short demonstration of this capability.
- Say you wanted to replace a TCP stream of a WWW session, so that every time the address www.google.com would redirect you to www.mutsonline.com.
- Chose the Spoofed source and destination computers, as shown before, and start the spoofing process.

- Press “F” to edit your filters:

- We want to edit the “Filters on source” to replace www.google.com to www.mutsonline.com on destination port 80. To do this, we press “W” to enter the Source filters. We then press “A” to add a filter. Choose the specified filter (in case we have a few) and press enter to edit it. Add the required input to create your filter.

- Pressinq “Q” will exit this screen and ask us if we want to save our filter. Choose “yes“.
- We are now back at the filter screen. Notice that we just made the filter; we still have not ACTIVATED it (both filters are “OFF”).

- To activate the filter we need to press “S”, and then we should see the filter status turn to “ON”.
- We now try to surf to www.google.com on the attacked machine:

- ouch…
- When I tried this tutorial in class, I noticed that the example did not work perfectly – perhaps because Google has different sitenames that are redirected according to geographical location, so I followed this with another example.
- In this example we will manipulate text from a financial article on cnn.com, as seen by an attacked computer. This is the page before we intervene:

- “Invertors cash in” because of a weakness in something or other…We will now manipulate the data in such a way the content of the site will change – only on the victim’s computer though. Let’s reverse the meaning of the article. Let’s make the heading – “Investors cash out“.
- Basically what this means in Ettercap terms is that we will replace the string “in” to “out”, on the http session.

- Please note – this is not a Web server defacement – it’s manipulation of the data stream that reaches a specific host in our network, in conjunction with ARP spoofing.
- Conclusion
- So how do we protect our Organization from this evil, evil type of network activity? Well, you’re not going to like the answer – There’s no simple way. We could use Arpwatch, which is a small daemon that runs on Linux. Arpwatch monitors Ethernet activity and keeps a database of Ethernet / IP address pairings, and can alert on any unexpected changes. Or, we could occasionally use Ettercap to check for the presence of other poisoners.

- I’ve heard of other solutions, concerning switch port security, however I haven’t had the opportunity to test this – I’d be glad to hear your experiences. By the way, the Linux version of Ettercap has many more features and plugins (such as DNS spoofing plugins), but you have to start somewhere right?
- A FEW EXAMPLES from the EtterCap Readme PDF:
- ettercap -b
- Use broadcast ping to scan the LAN instead of ARP request all the subnet IPs.
- ettercap -s 192.168.0.1 192.168.0.2
- Enter the interactive mode and sniff only the connections between 192.168.0.1 and 192.168.0.2.
- ettercap -zs -e etter.conf
- Use the IP-based sniffing mode and load the other option from the config file (etter.conf). Note that options in the file override command line.
- ettercap -Nzs victim.my.net ANY:80
- Sniffs in console mode (non-interactive) only the connection to and from “victim.my.net” starting or ending to all other hosts but on port 80 (www). Data are dumped in ASCII mode. To dump in HEX mode add the -x option.
- ettercap -NRzs remote.host.net:23 my.local.host.com
- Useful to sniff in console mode (non-interactive) all the connections on a remote LAN on which you are executing ettercap. This example will prevent showing your telnet (:23) connection from “my.local.host.com” to “remote.host.net”.
- ettercap -Nclg
- This will provide you the entire list of hosts in the LAN. Will check if someone is poisoning you and will report its IP. Will tell you if you are on a switched LAN or not.
- ettercap -NCLzs –quiet
- This will detach ettercap from console and log to a file all the collected password. Only works if the LAN is hubbed, or if collected password are directed to your host.
- ettercap -Np ooze victim.mynet.org
- Launch the plugin “ooze” that will portscan the host “victim.mynet.org” that will be translated with the right IP


